Wednesday, September 8, 2010

Saj Bread


I've had this recipe available for quite awhile. I've hrmmed (that's a word, right?) over it for awhile. I think part of the reason I didn't upload was because the photo quality isn't ideal. Maybe one day I'll make it again and update the photo, yes?

I decided that the bread was just TOO good not to share. There was absolutely no leftovers once I made this and I was quite disappointed I didn't have enough yeast to make it again. The boy and I were like lions fighting over the last piece :P

I'd never heard of Saj Bread before, but thought it would go excellent with the curry I made it with. It's flat, chewy, and just plain delicious.

You could even make it like a dessert by adding cinnamon sugar and honey on top. Maybe a couple squirts of whipped cream? Anyone? Anyone? ;)

Saj Bread
1 tbsp. active dry yeast
1 tbsp. sugar
1 1/2 c. warm water (110 to 115 degrees)
3 1/2 c. all-purpose flour
1/2 tsp. salt
oil for coating the dough


Mix all the ingredients using a blender, except the flour and the remaining 1/2 cup of water. Then pour the mixture in a big bowl, sift the 3 1/2 cups of flour on top and start mixing until smooth and no longer sticky (also add the 1/2 cup of water in this step.)

Cover with a damp cloth and put in a warm place for 1 hour. After 1 hour the dough should be doubled in bulk. Knead with hand for a few minutes, then start to divide the dough into medium sized balls.

Using a floured rolling pin (you can also flatten with your hands if you prefer) start rolling the balls into circles on a lightly floured service (in this step use the oil for coating).

Put a skillet on low heat. When it becomes hot, put the flattened dough in it. Bake for 30 seconds to 1 minute until golden. Flip the bread to the other side for another 30 seconds. Pile your bread and cover to keep them soft.

Serve immediately.

Saturday, September 4, 2010

Barbecue Macaroni Beef


I have landed in the land of cornfields and you know what that means? I finally get to cook again! I quickly dived into my very few cookbooks for ideas and honestly, I wasn't that impressed with what I found. Nothing seemed to satisfy my need to feed. I'm blaming the cold that seems to slowly taking up residence in the back of my throat and nose. Bah!

So I found this recipe and tweaked it to my liking as I felt the original recipe just called for too much barbecue sauce (28 ounces!) and didn't call for the veggies to be cooked. I don't know about you, but I don't want to be chewing on soft macaroni...warm ground beef...and then practically breaking my tooth off on some hard celery. No thanks! It also didn't call for any type of seasoning. Anyone who knows me and knows my cooking knows that I LOVE seasoning, especially pepper and garlic powder! I just had to add seasonings into this recipe. :)

I hope you enjoy this quick meal with simple ingredients. Overall with our trip to the grocery store last night and this meal cost $8.22 (not including the cost of spices if you might use them/need them or BBQ sauce as we already had some) and the recipe says it serves 4. My biggest pot is very full and could easily do 6 servings or more! It's a inexpensive meal even if you calculate in spices and BBQ sauce it'd be under $10 total! :)

Barbecue Macarnoi Beef

adapted from Taste of Home: The Busy Family Cookbook

8oz. elbow macaroni

1lb. ground chuck

1 bottle of your favorite BBQ sauce

1 medium yellow onion, peeled and chopped

1 medium green pepper, chopped

3 celery ribs, chopped

Salt, to taste

Pepper, to taste

Dean Jacob's 4-1 Gourmet Seasonings (using: Char Grill'n Broil Spices & Herbs), to taste


Cook the macaroni as directed on package. Drain and place back in large pot with some olive oil (optional) to prevent sticking.

Meanwhile, in large skillet cook beef over medium heat. Season with the Char Grill'n Broil Spices Herbs as desired, or use another seasoning. Drain the meat and place in same pot as noodles. Stir together.

In same skillet heat some olive oil and cook chopped vegetables until soft. Add salt and pepper to vegetables if desired. Add to noodle and meat mixture.

Depending on how much barbecue sauce you like, I'd start with a little at a time and add as little or as much as you'd like. I used about 8-9oz. of my 18oz. bottle and was satisfied. Again, it's all about personal taste.

Heat through and serve with buttered bread! Enjoy!

*I am in no way affiliated with any of the products or websites linked. I was not paid to use the products linked. These are items that I personally use and like and would like to share.

Monday, April 19, 2010

Navy Bean Soup with Turkey Sausage


I find it hard to conjure something up after working for ten hours, but tonight I managed. With stress washing over me and the rain drizzling down outside all I could think of was warmth and a good book. Do you ever get like that? Sometimes a good cup of coffee works, but tonight I wasn't looking for something to drink...

But there is always vodka in the freezer :P

This is a delicious inexpensive soup. It may seem like a lot of ingredients, but believe me it's well worth it! I just love all the depths of flavors this soup has.

I used turkey sausage, you can use whatever you'd like. Got some ham frozen from Easter? Great! Use it! Add bacon, salt pork, summer sausage, whatever you so desire! Or keep it meat-free, that's always nice too :) (Even though the ham bone or shank to flavor is meat...eep! You know what I mean!)

This recipe does not include soaking time. Please rinse your beans and check for pebbles and other debris the night before. Soak overnight in water.


Navy Bean Soup with Turkey Sausage

16 oz. bag of navy beans (soaked overnight), drained
14 oz. Hillshire Farm Smoked Turkey Sausage (one package), diced
8 cups of water
2 large carrots, finely diced
2 large stalks of celery, finely diced
1 large onion, finely diced
1 cup potato, finely diced
3oz. of tomato paste (should find a 6oz. can)
2 garlic cloves, finely minced
2 bay leaves
1 cube chicken bouillon
1 leftover ham bone or shank
1 tbsp. dried parsley
2 tsp. garlic powder
salt and pepper to taste
olive oil


Rinse soaked beans and set aside.

In large stock pot drizzle some olive oil and on medium heat add onion, celery, carrots, and garlic to pot. Sweat for 10 minutes. Do not brown!

Add in navy beans, water, potatoes, tomato paste, bay leaves, chicken bouillon cube, and garlic powder.

Bring to a boil.

Reduce to low and let simmer for 1 1/2-2 hours. Add salt and pepper to taste. Add dried parsley.

Add in sausage and heat through. Remove bay leaves and ham bone/shank before serving!

Enjoy with a thick crusty bread :)


*I am not paid to advertise any of the product(s) I have linked. I have not been asked to advertise them or create recipes using them. These are just some of the product(s) I love to use and love to eat and want others to know about them too!

Sunday, April 11, 2010

Shredded Beef Enchiladas


I used to really not be a big fan of Mexican cuisine until we found this local hole-in-the-wall place down the road from our house. It's run by a few brothers and they're always kind and generous to us as we're pretty active customers. The food is great and you get TONS of it for a decent price! Unfortunately with my parents being gone and me to fend for myself, I wasn't about to go dine alone when I craved Mexican early this morning.


Searching my mothers spice drawer I found a packet of Lawry's Enchilada Sauce seasoning. I'm a big fan of McCormick and Lawry's so I trusted their little packet to get me through and make this dish semi-homemade. Honestly I just didn't want to deal with all the steps to make a homemade enchilada sauce, hehe. The sauce itself was easy to create (packet + water + time) and it has a real authentic taste with an ever so slightly kick, if you want to call it that. I'd say it's more of a pinch from your kid sister :)


Shredded Beef Enchiladas

Beef Top Round Roast, 1.5-2lbs.
1 large yellow onion, roughly chopped
Flour or corn tortillas
Shredded cheese (Mexican blend, Cheddar, whatever you desire)
2-2 1/2 cups of water, divided
3 tbsp. red wine vinegar
2 tbsp. of Mrs. Dash's Extra Spicy seasoning blend (or you could substitute with chili powder)
2 tbsp. ground cumin
2 tsp. oregano
6-8 cloves worth of Spice World's Minced Roasted Garlic (you could also use fresh minced)
Sour cream, guacamole, salsa (optional)


Cut roast into manageable pieces if it won't fit in a large heavy pot as a whole (I had to cut mine into 3 pieces, this also helps for shredding later). Turn heat to low-medium and add in 2 cups of water, red wine vinegar, Mrs. Dash's Extra Spicy seasoning, cumin, oregano (when used dried herbs crush between your fingers when adding to get the full fragrance and flavor), onion and garlic.

On a gentle simmer (do not boil!) cook roast for 2-4 hours until meat is cooked through, tender, and falls apart easily. You could always do this in a crock pot. If water gets too low after cooking for awhile, add half a cup of water to the pot. You don't want to drown the meat, but just give it a little more juice :) Once cooked, turn off the heat and use two forks to shred the meat. You don't want big chunks in your enchiladas!
Follow the instructions on the Lawry's Enchilada Sauce packet to create the sauce.

If your flour or corn tortillas are cold, I would recommend zapping them in the microwave for about 20 seconds so they have less tendency to break or tear. Be sure not to dry out the edges.

Once sauce is completed cooking you're ready to assemble! In a 13"x9" baking dish pour 1 cup of the enchilada sauce into the bottom of the baking dish. On your work service spread a large spoonful of enchilada sauce in the center of your tortilla and spread out to the edge of the tortilla, saving about 1/2" (you don't want it to gush out all over the counter). Make sure your meat is well drained, but not dry, before placing it on your tortilla. Assemble meat and cheese, fold tortilla, and place seam side down in the baking dish. Repeat as many times as necessary.

Pour more enchilada sauce over your tortillas (reserve some for after they come out of the oven). Top with shredded cheese and pop into a 350 degree oven for 15 minutes or until the cheese is melted and bubbly!
Serve hot with sour cream, guacamole, salsa (may I recommend Chachie's Peach & Mango Salsa as it has a great compliment to the spicy sauce), etc. Rice and beans work great too :)


*I am not paid to advertise any of the products I have linked. I have not been asked to advertise them or create recipes using them. These are just some of the products I love to use and love to eat and want others to know about them too!

Sunday, April 4, 2010

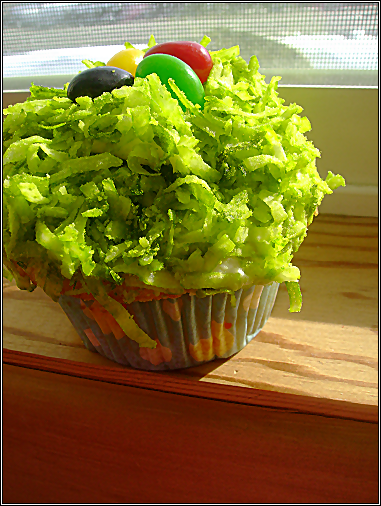
Happy Easter!

butter cake with cream cheese frosting, topped with sweetened coconut flakes.

Thursday, April 1, 2010

Sticky Meyer Lemon Rolls


So these didn't turn out quite as I'd hoped. Some days just really aren't baking days. On top of that I tried to cheat out of making the actual cinnoman roll dough by replacing it with pre-made crescent roll dough that comes in the can at the supermarket. Although they weren't perfect, they still tasted lovely and I'd totally make them again (the correct way of course, LOL!)

Although I was worried about the fact that 2 lemons went into this, it wasn't overly lemony. In fact, the roll part was just lightly hinted with lemon. I added cinnoman along with nutmeg in my version, but not much as I wasn't sure how lemon and cinnoman would pair. I think it was just enough though :) (1 tsp. or less I believe I added.)

Now let's talk about the glaze. PHENOMINAL! Oh man, I could just whip that stuff up and eat it out of the bowl. I slathered that gooey sugary goodness onto my little rolls and was in heaven. I'm totally looking forward to baking with lemons again in the future and I'm 100% certain anything baked and sweet will get a heavy dosing of this SWEET glaze! :) 5 stars from this fat kid! Hehe.


Sticky Meyer Lemon Rolls
from Dishing Up Delights


Lemon Roll Dough
1 1/4 teaspoons yeast
 (not fast acting)
6 tablespoons milk, warmed to about 100 degrees
4 tablespoons unsalted butter, softened
2 tablespoons white sugar
1 teaspoon vanilla extract
2 1/4 cups flour
1/4 teaspoon salt
Scant 1/4 teaspoon nutmeg
Scant 1/4 teaspoon cinnamon (optional)
Zest of 1 lemon
1 egg


Sticky Lemon Filling
1/2 cup sugar
Dash of ground nutmeg
1/4 teaspoon powdered ginger
1 lemon zested and juiced
2 tablespoons unsalted butter, softened at room temperature


Lemon Cream Cheese Glaze
2 ounces cream cheese, softened
Juice of 1/2 lemon
1/2 cup powdered sugar
Zest of 1/2 lemon


To make the dough
In the bowl of a stand mixer sprinkle the yeast over the warmed milk and let it sit for a couple minutes. With the mixer paddle, stir in the softened butter, sugar, vanilla, and 1/2 cup of the flour. Stir in the salt, nutmeg, and lemon zest. Stir in the eggs and enough of the remaining flour to make a soft yet sticky dough.

Switch to the dough hook and knead for about 5 minutes, or until the dough is elastic and pliable.
Spray the top of the dough with vegetable oil, and turn the dough over so it is coated in oil. Cover the bowl with plastic wrap and a towel and let the dough rise until nearly doubled, about an hour.
To make the lemon filling:
In a small bowl, mix the sugar with the nutmeg and ginger, and butter.

Lightly grease an 8x8 inch baking dish with baking spray or butter. On a floured surface pat the dough out into a large yet still thick rectangle. Spread evenly with the butter-lemon mixture. Roll the dough up tightly, starting from the top long end. Cut the long dough roll into even rolls, about 2-inched wide, and place them, cut side up, in the prepared baking dish.

Cover the rolls with a towel and let them rise for an hour or until puffy and nearly doubled. If you want to prepare these ahead of time, place them in the refrigerator, then let them rise at room temperature for an hour before you want to bake them.

Heat the oven to 350 degrees. Place the rolls in the oven and bake for 25-35 minutes or until a thermometer inserted into a center roll reads 190 degrees.

While the rolls are baking, prepare the glaze. With a mixer or by hand, whip the cream cheese until light and fluffy. Add the lemon juice and blend until well combined. Add the powdered sugar and blend until smooth and creamy.

When the rolls are done and slightly cooled, smear them with the cream cheese glaze, and sprinkle the zest of 1/2 a lemon over top to garnish. Serve while warm.

Friday, March 12, 2010

Peanut Butter Poppers for Pups!

I'm a complete animal lover, so when a co-worker asked if I'd be interested in helping out with a bake sale to help raise money for a Pug they rescued I was all about it. Poor Sherman needed knee surgery and it cost about $1,500! This is a rescue that pays for everything based off donation and is run strictly by volunteers! 100% non-profit! Although Sherman has had the surgery and is doing well, they're hosting a bake sale this weekend at their Pug party to help raise money to pay for the very expensive bill :) If you'd like to check out the rescue (and possibly donate or even ADOPT a Pug!) visit their website: Polar Pug Rescue.

In addition to people food I made these super easy peasy dog treats too for Fido :) Of course they're people friendly in ingredients, but I don't think you'd enjoy them as much, lol! I altered the original recipe slightly because I found the original recipe's dough to be dry and impossible to keep together to roll out to do cutouts!


Peanut Butter Poppers
from my lovely friend Ericka J.

2 cups whole-wheat flour (you must use whole wheat)
1 tbsp. baking powder
1 cup peanut butter, smooth or chunky
1 cup milk
approx. 1/2 low-sodium chicken broth


Preheat oven to 375 degrees.

In a bowl, combine flour and baking powder. In another bowl, mix peanut butter and milk, then add to dry ingredients and mix well. If batter doesn't come out smoothly and doesn't stick together in a nice dough add a few splashes of chicken broth to help bind it all together.

Place dough on a lightly floured surface and knead. Roll dough to 1/4 inch thickness and use a cookie cutter to cut out shapes. I found with my cookie cutter I got about 22 dog bones and a few extra treats (excess dough) that I rolled into balls and then slightly flattened.

Bake for 18-20 minutes on a greased baking sheet until lightly brown. Cool on a rack, then store in an airtight container. (They keep longer if left in the fridge) --- Make sure you watch your cookies as these can burn easily!

Just realized my tags say "baking soda" eep! It is actually baking powder! Sorry!